Sunday, January 22, 2012

Modular Gaming Table: Part 5b

I just couldn't help it, I wanted to do a test with a 4x3 configuration. I was amazed by how easy all the panels just clicked into place. I did have one setback though. I discovered that I made a mistake on one of the panels. Somehow the panel borders where assembled in the wrong order, rendering the panel useless. I will have to remake it or adjust the cut-outs in the borders. Luckely for me I did anticipate the chance for human error and bought some extra materials upfront. When doing 12 panels one is bound to go wrong I guess.

When seeing the whole thing assembled it did bring back a smile on face :)

This is the configuration I made


Bringing everything downstairs and assembling it took me 30 minutes. The whole test did made me realize that the bars underneath the panels should have a total margin of 4 mm. This will give the panels more movement for adjusting their position. In overall I'm very content with the result so far.

Thursday, January 19, 2012

Modular Gaming Table: Part 5a

It took me a while, but I finally managed to finish all 12 panels. When I finished the first 6 panels I tried out a 3x2 configuration. This would prove the concept and would determine whether I could continue with it or whether I could throw the whole thing away. Luckily for me the test turned out positive.


All the panels fitted nicely into the frames and aligned perfectly with the neighboring panels. There were two panels that didn't align when positioned in a certain way, but that had to do with the bars underneath the panel being a bit too tight. Nothing that couldn't be fixed with a bit of sanding.


I also discovered that the table sinks a bit in the middle and actually helping press the panels together. I'm a bit worried how this will venture with the hills because these are 4 cm higher. There is always the possibility to put legs in the middle to push the table straight. I guess there's only one way to find out (crossed fingers).

I will now go through the extra steps required for the river panels. Assembling a river panel is almost identical as that of a normal panel except for the adjusted panel borders. Below a river panel which will hold a straight river section.


It's important that all river panels match at all connecting sides.


The foam I use has a thickness of 2 cm. This means if I cut a trench in the foam it's either going to be 2cm deep or somewhere in between if I cut it out on the surface, the latter being far from easy. In previous experiments I used a blowtorch to superficially cut out a trench in the foam. The problem with this method is that there's hardly any control. When the melted foam sets it hardens preventing you to cut any deeper. The hardened foam cannot be sanded or worked with, in any way.

On the other side having a trench of 2 cm means you will have to fill it completely with some kind of filling material to get the desired depth or use some advanced foam cutting techniques.

So, unless you have foam cutting tools like a Freehand Router, Hot Knife or even an Adjustable Sled Guide you will need to create a foam cutter that can cut through a 60x60 cm foam board in one go. In my case I've attached two electrical wires to the floor and ceiling with 15 cm of thin iron wire in between. Connecting the middle iron wire with two "D" batteries makes the wire hot enough to cut through foam. With this wonderful piece of engineering I was able to cut the river boards.

You do have to watch where you're walking
This is what I did. Take the foam board. Draw the river section on top of it. Cut the river section out with a foam cutter at a slightly angled degree like this [\ /]. Take the cut-out river section, place it vertically and cut it in half at the desired height. Throw away the top part of the river section, and glue the foam parts together on the panel.

Foam parts
Foam parts glued within panel
In my next post I'll work on the four hill panels. I case you're wondering this is how it looks when the panels are stored.

I could think of many uses for this; pizza anyone?

Wednesday, January 11, 2012

Modular Gaming Table: Part 4


After many weeks of planning, designing, testing and collecting materials I can finally start creating some panels. In a previous post I explained the design plans of the panel I'll be making.

Because precision is paramount to the success of this project I've ordered all of the wood to be pre-cut according to the design plans. Sadly enough because its wood with actual manual labor involved not all parts are exactly the same. If these slight differences are not accounted for, it could add up to x mm and thus preventing them to fit in the frames.

In the weeks of preparation I've collected all the wood necessary for creating 12 panels. Below a picture of the complete stack.


I did the cut-outs of the borders myself; otherwise, the price would have been doubled!
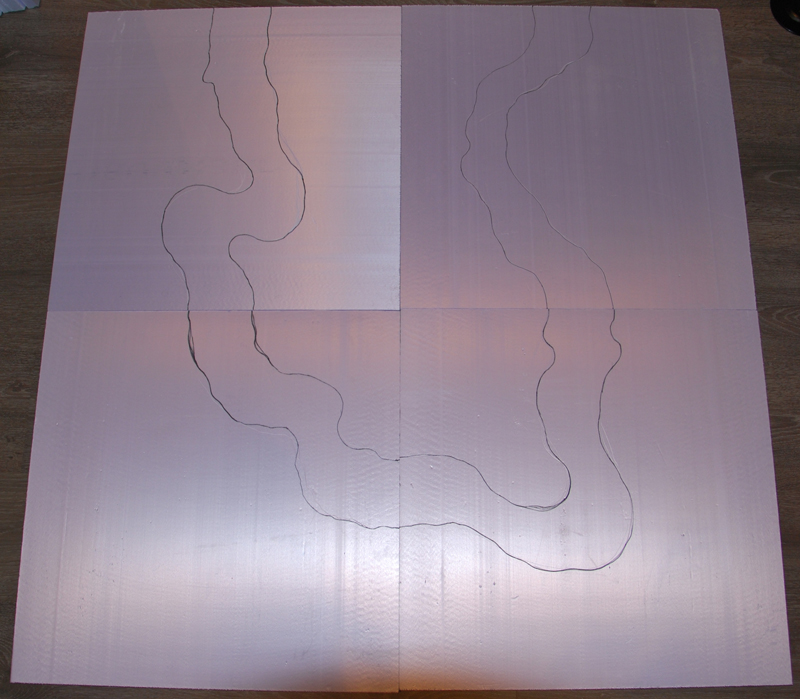
So now we can start with the panels, right? Not quite yet. The river and hill panels need some extra prep-work before assembling them. First, I pre-cut all XPS boards at 55x55 cm and draw the design of the rivers and hills on them.

The 2 straight and 2 bended river boards
The other straight river board
The four hill boards
After this I've made cut-outs in the panel borders of the river panels where they would connect to each other. These cut-outs are exactly in the middle of the panel and are 10cm wide. This will allow them to be used on all connecting sides.

5 river panels means 10 borders with the middle cut out

Alright, now for the fun part. Assembling a panel!

I start out with a 6mm thick 60x60cm MDF board. Glue two bars on top of it and make sure the frame still fits afterwards. The initial plan was to place these bars 20mm from the sides so that it would hold the panel in place in all directions. Later I discovered I needed extra space for the support bars of the legs. These are attached on the inside of the frame.

For now the two bars will hold the panel in place in one of both directions. After everything is assembled and tested I'll place side bars to hold the panel in place in all directions, without losing the extra space for the support bars. First I need to make sure everything fits according to plan.

I now glue the panel borders one at a time making sure they are exactly at a 90 degrees angle and 60cm apart from each other (measured for the top). The boards are slightly larger cut and will leave them sticking out below the borders. When assembled I sand the whole panel removing these parts.

Lastly, the XPS board is glued within the panel. Piece of cake, right?


An assembled panel

There you have it, an assembled panel. I'll repeat this process 11 times until I got 12 panels, not forgetting to use the special cut-out panel borders for the 5 river panels.

In my next post I'll go through the extra steps required for the river and hill panels.

Thursday, January 5, 2012

Modular Gaming Table: Part 3

Alright, I now have panels, a table to place them on and a border to make it look cool. But, I still need scenery. Creating the scenery and the panels actually go hand-in-hand. You cannot start creating a panel if you don't know what type of scenery you're going to put on it. That brings us to the following question: what type of scenery will the panels have?

I could just create 12 empty grass plain panels and rely solely on modular terrain pieces to add elements like hills, water sections, woods and buildings etc. It's certainly the most flexible option but it would be way too easy and besides it doesn't always look as good as static scenery elements would. On the other hand static scenery does limit the number of combinations one has with the panels. To get the best of both worlds I needed to figure out which static scenery elements I could use without restricting the number of combinations too much.

First you need to know what type of configurations there are. The picture below will demonstrate some (not all) of the main table configurations.


The table border can only be used around the rectangular configurations. To circumvent this problem you could use empty panels on the non-rectangular configurations. These panels could be used for dice rolling or to put stuff on. So the missing panels of the non-rectangular configurations could resemble a dice panel or no panel or frame at all. The later preventing the placement of a table border of course. Yeah I know a major issue.

After some fiddeling about with paper cut-outs representing the panels I decided on four different types of panels.

3 empty grass plains
3 grass plains with streight  river
2 grass plains with bended river
4 grass plains with hill in corner

I've worked out all the possible combinations I could make using the first 5 configuration types. I quickly discovered this to be a horrendous job. I painstakingly managed to complete the first 3 configurations types without losing my mind and in doing so creating a total of 976 possible combinations! Doing the other configurations it can easily go up to about 1500+ combinations. I've setup a page here where you can see all the combinations (not completely finished yet). The idea is to look up your config through this website. So for example, you would say "We're playing 3x3 x8:y14" which would result in this image:


Because the above config has a red border it means it can be mirrored and of course turned in a couple of different ways. The page mentioned above only works out the different types of panels and the combinations possible with them.


Having come this far I now need to work out the exact details of the panel types. For example how the river and hill panels will look like. Luckely for me I'm the owner of the board game called Carcassonne. This game is based on tiles which you play in order to create a landscape. I discovered I can use the designs of the river sections of this game for the river panels.


Cool looking river sections
This leaves me to work out the hill and grass plain panels which will probably be similar to those of the Citadel Realm of Battle Gameboard. Except without the steep slopes. The important aspect of the hills is that all four hill panels match at the corners. Like the picture below demonstrates:


All four hill corners connected to form one big hill
Of course one could also argument why not use the Citadel Realm of Battle Gameboard instead. With some slight modifications these could be used on the modular gaming table. There is of course an obvious pricing issue involved but apart from that I doubt it's longevity. There's a big change GW makes a slightly different version or discontinues the boards all together. I already experienced this with their Flock product. The whole point of having a modular table is the ability to expand it with new panels or replace panels over time. The more you make yourself the less reliant you are and besides it's a hell of lot cheaper and fun to do it yourself.


This concludes the prep-work. At the time of writing I'm still waiting on some materials to arrive. In upcomming blog posts I'll go in more detail on the actuall making of the panels and the materials used.

Wednesday, January 4, 2012

Modular Gaming Table: Part 2

As I explained a bit in my previous post I'm planning to use the modular gaming table with modular boards further referred to as "panels". These panels will contain the desired scenery. As I have 2 sets of 6 frames I'll be making 12 panels. Each panel wil be 2x2 feet or 60x60 cm. The panel itself will be made out of Medium-Density Fibreboard (MDF) and Extruded Polystyrene Foam (XPS). The picture below will demonstrate the complete make-up of the panel.

Panel construction
Constructed panel
The panel on top of a frame
As you can see the panel has two bars underneath it. These will help hold the panel in place when placed on top of a frame. The panel border help protect the XPS and function as connection points for the table borders.

The table borders are completely optional and do cut a hole in your budget. The idea is to be able place a border around a constructed table without losing the modular aspect of it. 

Each panel border has two cut outs where one part of a "Kugelschnaepper" is placed. I don't know how it's called in English but it literally means "bullet snapper". The picture below will shows one up close.

I'll need 48 of these
The other part of the "Kugelschnaepper" will be attached to the table borders which will allow them to connect. The pictures below will demonstate how this is done.

A panel border with two cut outs
One part of the "Kugelschnaepper" in place
A table border with two cut outs
The other part of the "Kugelschnaepper" in place 
To be able to place the table border around a constructed table two types of borders are required. A type for the sides and a type for the corners. The biggest possible configuration I can make is a 6x8 feet table or if you count the frames a 3x4 table. This means I need 12 side types and 4 corner type borders.


Now one can make a table with a border. Hurrah!!

A 2x2 configuration with table border

Tuesday, January 3, 2012

Modular Gaming Table: Part 1

When playing around with miniatures one needs to have a table to put them on. This could be an ordinary table, a simple wooden plank or whatever sound structure you have lying around. The important aspect of it is the stability and that it is large enough to play on.

For some people the above is simply not enough. Playing on the bare surface of whatever table you're using just doesn't cut it for must of us power mongers. We need to have scenery like grass, trees, hills, water and what not. There are numerous ways to make the most beatuiful and life-like scenery. Whatever scenery you're making it needs to be attached to something. Either directly to the gaming table or to some board which in turn can be placed on top of the gaming table.

Having a gaming table with a life-like scenery will suffice for most us. Finally you can harvest the fruits of you're hard work. But... after a while some people might get bored playing the same old scenery over and over again. The solution, modular gaming boards! You cut up your gaming board in multiple boards of equal size. These can then be placed in different configurations on top of your gaming table. Just like a jigsaw puzzle.

You're finally a happy gamer and life seems wonderful until your wife starts complaining about large pieces of boards lying around and that she needs her dining table back. You start to realize it might come in handy if you could somehow store those 6 or more gaming boards. Not to mention getting rid off that large cumbersome table.

Supercow al rescate! The modular gaming table is born...

A connection bar
Putting the bars in place
A perfectly black coated frame with leg attachments
Connecting 2 frames
Connecting 2x2 frames
2x2 configuration (image is skewed)
Putting the connection bars for the legs in place
A leg
Connecting the leg to the table
Stabilizing the leg with side bars
And there you have it, a modular table! (image is skewed)
And of course the storage option
The complete setup