Showing posts with label Rivers. Show all posts

Sunday, July 22, 2012

Modular Gaming Table: Part 11

I'm so happy 'cause today I've finished the river panels!

I immediately set about and played around with different 2x2 setups. Enjoy the results.

Config 2x2 x11:y0

Config 2x2 x1a:y0

Config 2x2 x13:y0

Config 2x2 x14:y0

Oldschoolrebel from the Lead Adventure Forum coined the idea of using the table as a stacking system for playing games with multiple layers. There are some limitations when using the stacking system. When stacking the legs need to be placed at the sides instead of under the table. This means borders cannot be used and you lose center support. I've tried the concept with a 2x2x3 setup. A 4x1x3 setup is probably better suited for this kind of multi-layered systems. Both players can stand on each side and move their miniatures a lot easier that way. Playing while daemons gather below in the underworld, or use special storage panels for placing miniatures and books. 3D gaming!

Legs at the side as in the storage setup
Same as storage setup except in a 2x2 config
First level
Second level
Third level
Next stop, the dutch mountains!

Sunday, July 8, 2012

Modular Gaming Table: Part 10

When I started this project, I made sure I knew how to make water. I think Mike down at TerranScapes makes the best water effects currently out there. Mike is what you call a professional terrain builder, and does this stuff for a living. It's no secret that most of my inspiration came from him. I learned a lot just by looking at his videos on YouTube. Too bad he doesn't do tutorials, it would have saved me a lot of time and money.

Luckily for you, I'll try to explain what I learned through trail and error. It took me to make seventeen test models before figuring out the exact methods. I went on a holiday and when I got back it took me another two tests to remember them again. I should have written them down somewhere.

Anyway, to create the water effect shown below you will need the following materials.

Oil paints (*), thinner and brushes

Epoxy and hardener
The Mod Podge! (gloss version)
The paint is used to dictate the color of the water and its depth. This is done by painting the ground surface of the river in the desired color and blending it accordingly. Typically, you'll want to paint the shallow parts of the river in a lighter color than the deep parts. Useally by blending from the center of the river to the borders. The quality of the blending determines 80% of the overall outcome.

I chose to make a typical blue river. While I was able to blend the various test models with acrylic paint fairly easily, I discovered it to be a lot harder on a larger surface. Although certainly not impossible, you need to work quickly when painting with acrylic paint. A bit to quick for my taste. Therefore, I decided to work with oil paints instead.

I've never worked with oil paints before, and I must say they're wonderful. The biggest advantage is the amount of time you have to paint your work. You can literally spend days correcting the paint-job. Sadly enough, this is also the biggest disadvantage. It takes ages to dry, but then again I believe the results are for the better.

A river panel after dry-brushing the surface
A river panel after giving the river its blue base color.
A river panel after blending
Close-up of the river (can you see the transition?)

Protect the paint-job with varnish. The epoxy can have a deteriorating effect on the paint. I've had test models in which some parts of the paint were affected by the epoxy. Make sure the paint is completely dry before pouring the epoxy, believe me, I'm not renowned for my patience.

Pouring the epoxy is pretty straightforward. First close the river ends with masking tape. Measure the amount of epoxy you need to make by pouring real water into the river. Remove the water, refresh the masking tape and mix both epoxy and hardener 2:1 in a container. At this stage add the desired pigment to the mix and pour it into the riverbed.

The tricky part is the amount of pigment you need to add the mix. Too much pigment will obscure the underlying paint-job, and too little will show too much of it. The right amount will help blend the underlying paint-job. I experimented with dark blue transparent dye, Vallejo Game Colors and oil paint. The Glass Attic website explains everything you need to know about this.

I chose to use the oil paint method, because I wanted to use a turquoise color. If I had a turquoise transparent dye, I would have used it instead. I needed to thin the oil paint with thinner, otherwise it wouldn't dissolve properly in the epoxy.

To avoid subtle color differences in between river panels, I created one big batch of epoxy and did all five river panels at once. I measured the required amount for each river panel. In my case I needed: (250 + 250 + 350 + 275 + 230)  = 1355 - (1355 / 3) = 903 ml of epoxy and 451 ml of hardener. With a margin added I ended up making 1.5 liters in total. After pouring the epoxy in a big container I added the pigment (thinned oil paint). Stir gentle when mixing the pigment, otherwise it will create bubbles.
While adding the pigment I tested the color and its transparency on a testing piece. This gave me a good indication of the amount of pigment I needed to add.
I divided the big batch between five smaller containers, each having the required amount of epoxy for its designated river panel written on it. Finally, I poured the hardener into each container, stirred it gently and poured it into its designated river panel, and made sure all five river panels were placed on a leveled table.

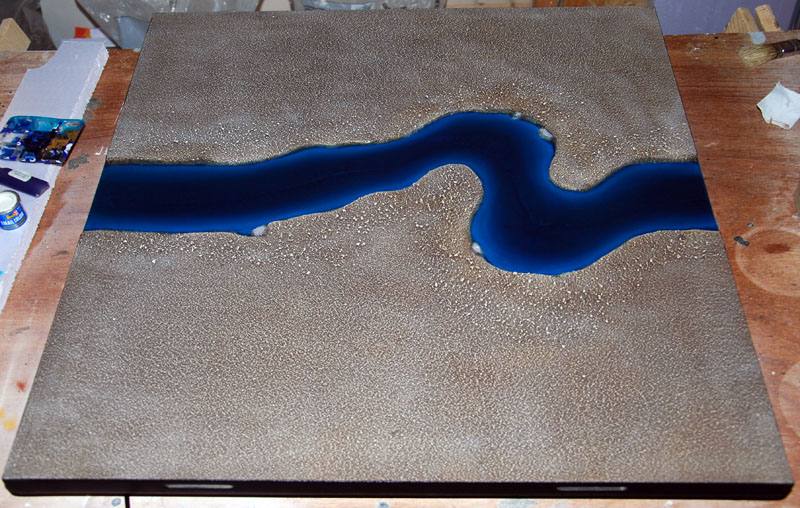
Depending on the amount, it takes about 16 hours for the epoxy to completely set. When finished it looks like this.

Sealed the river ends with masking type
Ready to fill the containers
The following day
A river panel with epoxy
It's possible to add static grass, field grass or other scenic elements, either before and/or after pouring the epoxy. Some materials like reed do tend to soak up the epoxy, making them shiny and rock hard when it sets. To circumvent this problem I recommend doing reeds after the epoxy sets, by drilling holes into the epoxy and gluing the reed in place.

Holes for the reed
The material
Does this count as soft cover?
The epoxy at the river ends will usually curl up a bit when setting. It's possible to sand it and/or level it by cutting it with a sharp knife. This will obviously leave clear markings, but don't worry, the Mod Podge will make it disappear.

What have you done!?!
At this stage the water looks unnaturally still and flat. To give the impression the water is moving, I created little waves on the surface of the water with Mod Podge. It´s basically a transparent all-in-glue mostly used for decoupage. Pour some of it on top of the surface, spread it out with a brush and create the desired patterns with it. Work gently, otherwise bubbles will form inside the glue.

There are tons of methods out there for creating waves. I only tried the Mod Podge method. Again, Mike from TerranScape knows a lot more about this than I do. He made videos about this in which he explains and tests various materials.

Are you sure about this?
You see, told you so
Tadaa! Just couldn't wait any longer


Another one finished
Connecting the two

I'm very pleased with how the water turned out. The pictures represent them well enough, although they don't seem to capture the clarity and the exact color very well. In RL the water has somewhat more turquoise color to it.

The only thing left to do, is the grass as explained in my previous post, but first I'll have to Mod Podge the other four river panels.

*) the oil paints I used are from the "van Gogh" series 1, from left to right: 504, 534 (series 2), 530 and 522.

Friday, February 3, 2012

Modular Gaming Table: Part 6a

Finally, some materials have arrived all the way from Los Angeles! I've ordered Foam Fusion, Foam Coat and Styroplast from the Hot Wire Foam Factory. For those not familiar with these products below are some review videos done by Terranscape:


I'm planning on using Styroplast on the hill-sides and the Foam Coat for the flat areas. But, before I can apply these materials I need to do some preparation work and various tests to get familiar them.

First, I continued with the river panels. Using a sharp knife I carved out more detail into the river borders, then I sanded the whole panel and poured modeling plaster into the river. Not too much, just about 3 mm thick. The plaster functions as a ground surface and helps to smooth out the borders. It also allows you to put some stones in place, like this:


When the plaster completely dried I sanded it again and made sure all connecting points matched. At this stage the river panels are ready for the Foam Coat. I'm planning on combining the Foam Coat with Latex wall paint and various stone materials to create the required surface. Normally the Foam Coat dries within 10 minutes, adding Latex will extend the drying time, furthermore it allows me to apply a thicker layer without wasting the three pounds of Foam Coat.

As for the hills, I wasn't quite sure yet on how to make them. I knew the basic shape and size, but didn't want to cut-out the cliff-sides with a knife or foam cutter. So, while working on the river panels I tried out different tests with plaster. If you combine the foam with plaster you can mould all kinds of intricate details into the plaster with some simple cutting tools. So, the plan is to put blobs of plaster on the hill-sides, mould the cliffs out of it and put the Styroplast over the plaster to give it a rock hard surface. Something like this:


Having worked out which methods to use for the hills, I started out by cutting the foams boards. I glued these together with Foam Fusion and created two pieces of 40x40x4cm and two pieces of 40x20x4cm. I placed them on the panels and outlined the initial shape of the hill with a marker, then I cut them out with a foam cutter and sanded the entry points of the two hills, like this:


Dutch mountains
As you can see I've cut out the sides of the hill in a 45 degree angle. This will serve as a bedding for the plaster. Maybe I'll remove some more foam later, a curved angle would be better than a straight one.

Just like the panels, the hills get a wooden border for protection. Incidentally, the hill border is a bit smaller than the panel borders. This has mainly to do with the fact that I ran out of materials than anything else. In this case only the hight and length are important. I made the hill borders a bit shorter than the actual hills, the plaster will straighten this out in the end.

Don't mind the markings, they're incorrect
All four hill panels with hill borders in place
The plaster takes awfully long to dry. When it does, I'll take you through the process of the actual moulding of the hills. After that, we're on our way for some serious foam coating.

Thursday, January 19, 2012

Modular Gaming Table: Part 5a

It took me a while, but I finally managed to finish all 12 panels. When I finished the first 6 panels I tried out a 3x2 configuration. This would prove the concept and would determine whether I could continue with it or whether I could throw the whole thing away. Luckily for me the test turned out positive.


All the panels fitted nicely into the frames and aligned perfectly with the neighboring panels. There were two panels that didn't align when positioned in a certain way, but that had to do with the bars underneath the panel being a bit too tight. Nothing that couldn't be fixed with a bit of sanding.


I also discovered that the table sinks a bit in the middle and actually helping press the panels together. I'm a bit worried how this will venture with the hills because these are 4 cm higher. There is always the possibility to put legs in the middle to push the table straight. I guess there's only one way to find out (crossed fingers).

I will now go through the extra steps required for the river panels. Assembling a river panel is almost identical as that of a normal panel except for the adjusted panel borders. Below a river panel which will hold a straight river section.


It's important that all river panels match at all connecting sides.


The foam I use has a thickness of 2 cm. This means if I cut a trench in the foam it's either going to be 2cm deep or somewhere in between if I cut it out on the surface, the latter being far from easy. In previous experiments I used a blowtorch to superficially cut out a trench in the foam. The problem with this method is that there's hardly any control. When the melted foam sets it hardens preventing you to cut any deeper. The hardened foam cannot be sanded or worked with, in any way.

On the other side having a trench of 2 cm means you will have to fill it completely with some kind of filling material to get the desired depth or use some advanced foam cutting techniques.

So, unless you have foam cutting tools like a Freehand Router, Hot Knife or even an Adjustable Sled Guide you will need to create a foam cutter that can cut through a 60x60 cm foam board in one go. In my case I've attached two electrical wires to the floor and ceiling with 15 cm of thin iron wire in between. Connecting the middle iron wire with two "D" batteries makes the wire hot enough to cut through foam. With this wonderful piece of engineering I was able to cut the river boards.

You do have to watch where you're walking
This is what I did. Take the foam board. Draw the river section on top of it. Cut the river section out with a foam cutter at a slightly angled degree like this [\ /]. Take the cut-out river section, place it vertically and cut it in half at the desired height. Throw away the top part of the river section, and glue the foam parts together on the panel.

Foam parts
Foam parts glued within panel
In my next post I'll work on the four hill panels. I case you're wondering this is how it looks when the panels are stored.

I could think of many uses for this; pizza anyone?